Introduction
 |
| How add to add lazy load to blogger website |
For many people today, blogging has grown to be a highly popular activity. You are aware of how crucial it is to have a quick-loading blog whether you are a blogger or a reader of blogs. Potential readers may leave your blog if it takes too long to load, which will also hurt your search engine rating. Lazy loading is one method for accelerating the loading time of your blog. We will talk about how to add lazy load to Blogger in this blog post.
What exactly is Lazy Loading?
Lazy loading is a technique that delays the loading of non-critical web page resources. This means that images, videos, and other non-immediately visible content will not be loaded until the user scrolls down to see them. By loading only the content that is immediately visible to the user, the website's load time can be reduced, improving user experience and SEO.
Why Would Blogger Introduce Lazy Loading?
Your Blogger site's performance can be considerably enhanced by adding lazy loading. It speeds up the loading of your pages and lowers the number of HTTP requests required to load your website. The user experience and search engine ranking of your website can both be enhanced by doing this, which may increase traffic and engagement.
How to Include Lazy Load in Blogger
Adding lazy load to your Blogger site is a simple procedure. There are several methods, but we'll focus on one of the most popular and simple: using a third-party tool called LazyLoad. Here's how to use LazyLoad to add lazy load to Blogger:
Install LazyLoad first.
Installing the LazyLoad script comes first. Follow these steps to accomplish this:
1. Navigate to Lazy load script for blogger to access the LazyLoad GitHub project.
2. To download the script, select the "Download ZIP" option.
3. The downloaded file should be unzipped to a folder on your PC.
4. Find the "lazyload.min.js" file by opening the folder.
5. To use lazy loading on your Blogger site, place the "lazyload.min.js" file in the root directory.
Add LazyLoad to Your Blogger Template in Step 2
1. The LazyLoad script must now be added to your Blogger design. Here is how you do it:
2. Go to the "Theme" option after logging into your Blogger account.
3. To view the template code, click the "Edit HTML" option.
4. Just above the opening head> tag, place the following code:
<script src='/lazyload.min.js '></script>5. Just above the ending </body> tag, place the following code:
<script>lazyload();</script>
6. Save your template.
Test LazyLoad on Your Site in Step 3
1. LazyLoad must be tested on your blog as the last step. Here is how you do it:
2. Visit a post on one of your blogs that has numerous photographs.
3. To the bottom of the page, scroll down.
4. Search the menu of your browser for the "Inspect" or "Developer Tools" option.
5. To access the browser console, click on it.
6. Keep an eye out for any LazyLoad-related problem messages.
In the absence of any error warnings, LazyLoad is functioning well. Best option in case the above doesn't work is to use the script below.
Blogger lazy load script place it just above </body> tag in the HTML file.
<script>//<;b.loaded=true}).attr("src",a(b).attr("original"))}});if("scroll"!=c.event){a(b).bind(c.event,function(c){if(!b.loaded){a(b).trigger("appear")}})}});a(c.container).trigger(c.event);return this};a.belowthefold=function(b,c){if(c.container===undefined||c.container===window){var d=a(window).height()+a(window).scrollTop()}else{var d=a(c.container).offset().top+a(c.container).height()}return d<=a(b).offset().top-c.threshold};a.rightoffold=function(b,c){if(c.container===undefined||c.container===window){var d=a(window).width()+a(window).scrollLeft()}else{var d=a(c.container).offset().left+a(c.container).width()}return d<=a(b).offset().left-c.threshold};a.abovethetop=function(b,c){if(c.container===undefined||c.container===window){var d=a(window).scrollTop()}else{var d=a(c.container).offset().top}return d>=a(b).offset().top+c.threshold+a(b).height()};a.leftofbegin=function(b,c){if(c.container===undefined||c.container===window){var d=a(window).scrollLeft()}else{var d=a(c.container).offset().left}return d>=a(b).offset().left+c.threshold+a(b).width()};a.extend(a.expr[":"],{"below-the-fold":"$.belowthefold(a,{threshold : 0, container: window})","above-the-fold":"!$.belowthefold(a,{threshold : 0, container: window})","right-of-fold":"$.rightoffold(a,{threshold : 0, container: window})","left-of-fold":"!$.rightoffold(a,{threshold : 0, container: window})"})})(jQuery);$(function(){$("img").lazyload({placeholder:"https://blogger.googleusercontent.com/img/b/R29vZ2xl/AVvXsEi8UUfPAkQe_0XQwb19oKPR50rzFYwVZmpN_OSHVr1W5_iV6cKTBJBgVvcgGPc4k4isjn5r6amEBxR6EXaP5tH60KG9KYL9SWkqDlsv0RuTfZ7DmeP5npBFwdx4c4mcBcQm8L2JQ2IcMNE/s10/loadingku.gif",effect:"fadeIn",threshold:"-50"})});//]]></script>How To enable lazy loading images And Webp Images In Blogger
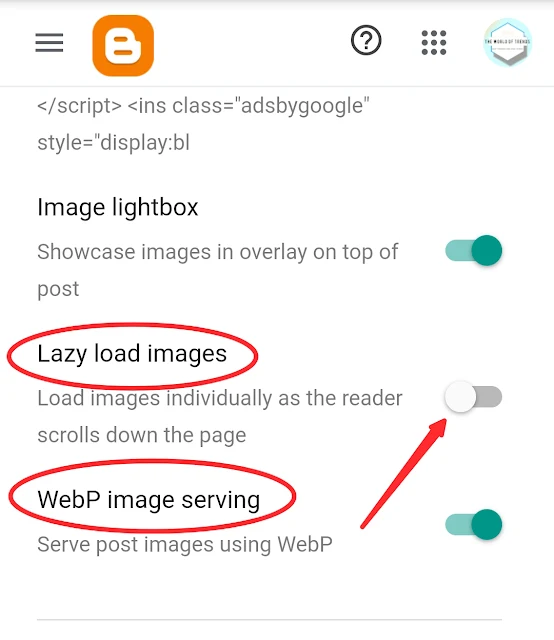
Aside adding the above script to your blogger template by following the detailed steps by step guide on lazy-loading blogger images. You can also add the lazy load feature to blogger in just one click. Originally this setting is not available in blogger but you can access it only if you use Content Management System (CMS) like cloudflare.
Once you have configured your DNS settings on cloudflare the lazy load feature will appear in blogger > settings > Post > Lazy load images. You can simply toggle the button to turn on lazy loading for your entire blogger website in one click.
If you also want to serve your images in "Webp" format in blogger which is the best format to serve images on your blog then this feature too will be available simple go to blogger > settings > Post > Webp Image Serving, Done!
Conclusion
A quick and easy solution to shorten the loading time of your Blogger site, enhance user experience, and boost SEO is to include lazy load. You may lower the number of HTTP requests required to load your site and boost its performance by postponing the download of non-critical content, such photos and videos, until the user can see them. Lazy load can be easily added to your Blogger site by using the LazyLoad script. Simply adhere to the instructions above, and you.

